
💡 Why use auto-reply to comments?
Every unanswered comment is a missed opportunity. Auto-replies keep your brand visible and responsive in the comments section - even when you’re offline. The right reply at the right moment keeps potential customers engaged and signals to others that your brand is active.✅ Before you start
- Processing Mode must be set to Advanced. See Understanding Processing Mode.
- An offer must be set up first. Both predefined and AI replies require an offer - your reply needs a destination link and product context. Please reach out to your Exerta team to set up offers.
- For predefined replies: a reply group must be created first. See Setting Up Reply Groups.
- For AI replies: an AI agent must be set up first. Please reach out to your Exerta team to set up your first AI agent.
- Understand sentiment labels before setting up. The condition for this rule uses sentiment labels. See Understanding Sentiment Labels.
⚠️ Set up your offer before creating this rule. Without an offer, your rule has no link to send.
Note:
- Do not use${short-link}in Instagram comments, as links are filtered out on Instagram. Use it in DMs only for Instagram.
-Do not use{@author}in Instagram comments. It inserts the username of the commenter rather than tagging them, so it feels unnatural to insert{@author}.
🛠️ Create your comment reply rule
💡 Steps 1-6 are the same for both predefined and AI replies. At Step 7, choose your path.Step 1 - Name your rule
Give the rule a descriptive name so you can identify it later. Example:Comment Reply - Facebook
💡 Include the platform in the name. You’ll need a separate rule for each platform, so clear naming prevents confusion.
Step 2 - Set the Moderation Target
Select which platform this rule applies to.⚠️ You need a separate rule for each platform. An Instagram rule will not catch Facebook comments, and vice versa.
Step 3 - Select engagement type
Choose whether this rule applies to paid engagement, organic engagement, or all engagement.Step 4 - Select your pages
Select the pages this rule applies to, or click Add all pages to apply it across all connected pages.Step 5 - Set the condition
Choose the condition that fits how you want this rule to work. A lot of customers use Matches Sentiment on its own, and that works well for most setups.| Condition | When to use |
| Matches Sentiment | Use this when you want the rule to reply to all comments matching your sentiment labels, regardless of keywords. Simpler to set up and works well for most accounts. |
| Does Not Contain Keywords but Sentiment Matches | Use this when you have a separate keyword-triggered DM rule and want to prevent the same comment from getting both a reply and a DM. The keyword list here acts as an exclusion filter. |
💡 If you’re not sure which to use, start with Matches Sentiment. You can always add keyword exclusions later.If you choose Does Not Contain Keywords but Sentiment Matches: how the exclusion list works The keyword list filters out comments you don’t want this rule to touch. Add keywords here for two reasons:
- You have a separate keyword-triggered DM rule for those words. Add them here so the comment gets the targeted DM, not a generic reply.
- There are words you don’t want replied to at all, such as competitor names, spam phrases, or words that should trigger a hide rule instead.
Step 6 - Select sentiment labels
Under Sentiment Labels, select Neutral, Interested, Positive.💡 Include all three labels. Many genuinely interested comments get classified as Neutral, not Interested. Leaving Neutral out means missing a large portion of potential customers. See Understanding Sentiment Labels.
📋 Optionally add Negative if you want to reply to hidden negative comments privately. The commenter still receives the reply even if their comment is hidden from public view.
📝 Path A - Reply with a predefined reply
Use this path if you want to send fixed reply text that you write yourself. Good for consistent, on-brand replies that don’t need to vary based on the comment.Step 7A - Set the action
Set Action to Reply with a predefined comment.Step 8A - Assign your reply group
Select the reply group you created from the dropdown.📋 Haven’t created a reply group yet? Set one up first in Setting Up Reply Groups, then come back here to assign it.
Step 9A - Submit and activate
Click Submit to activate the rule.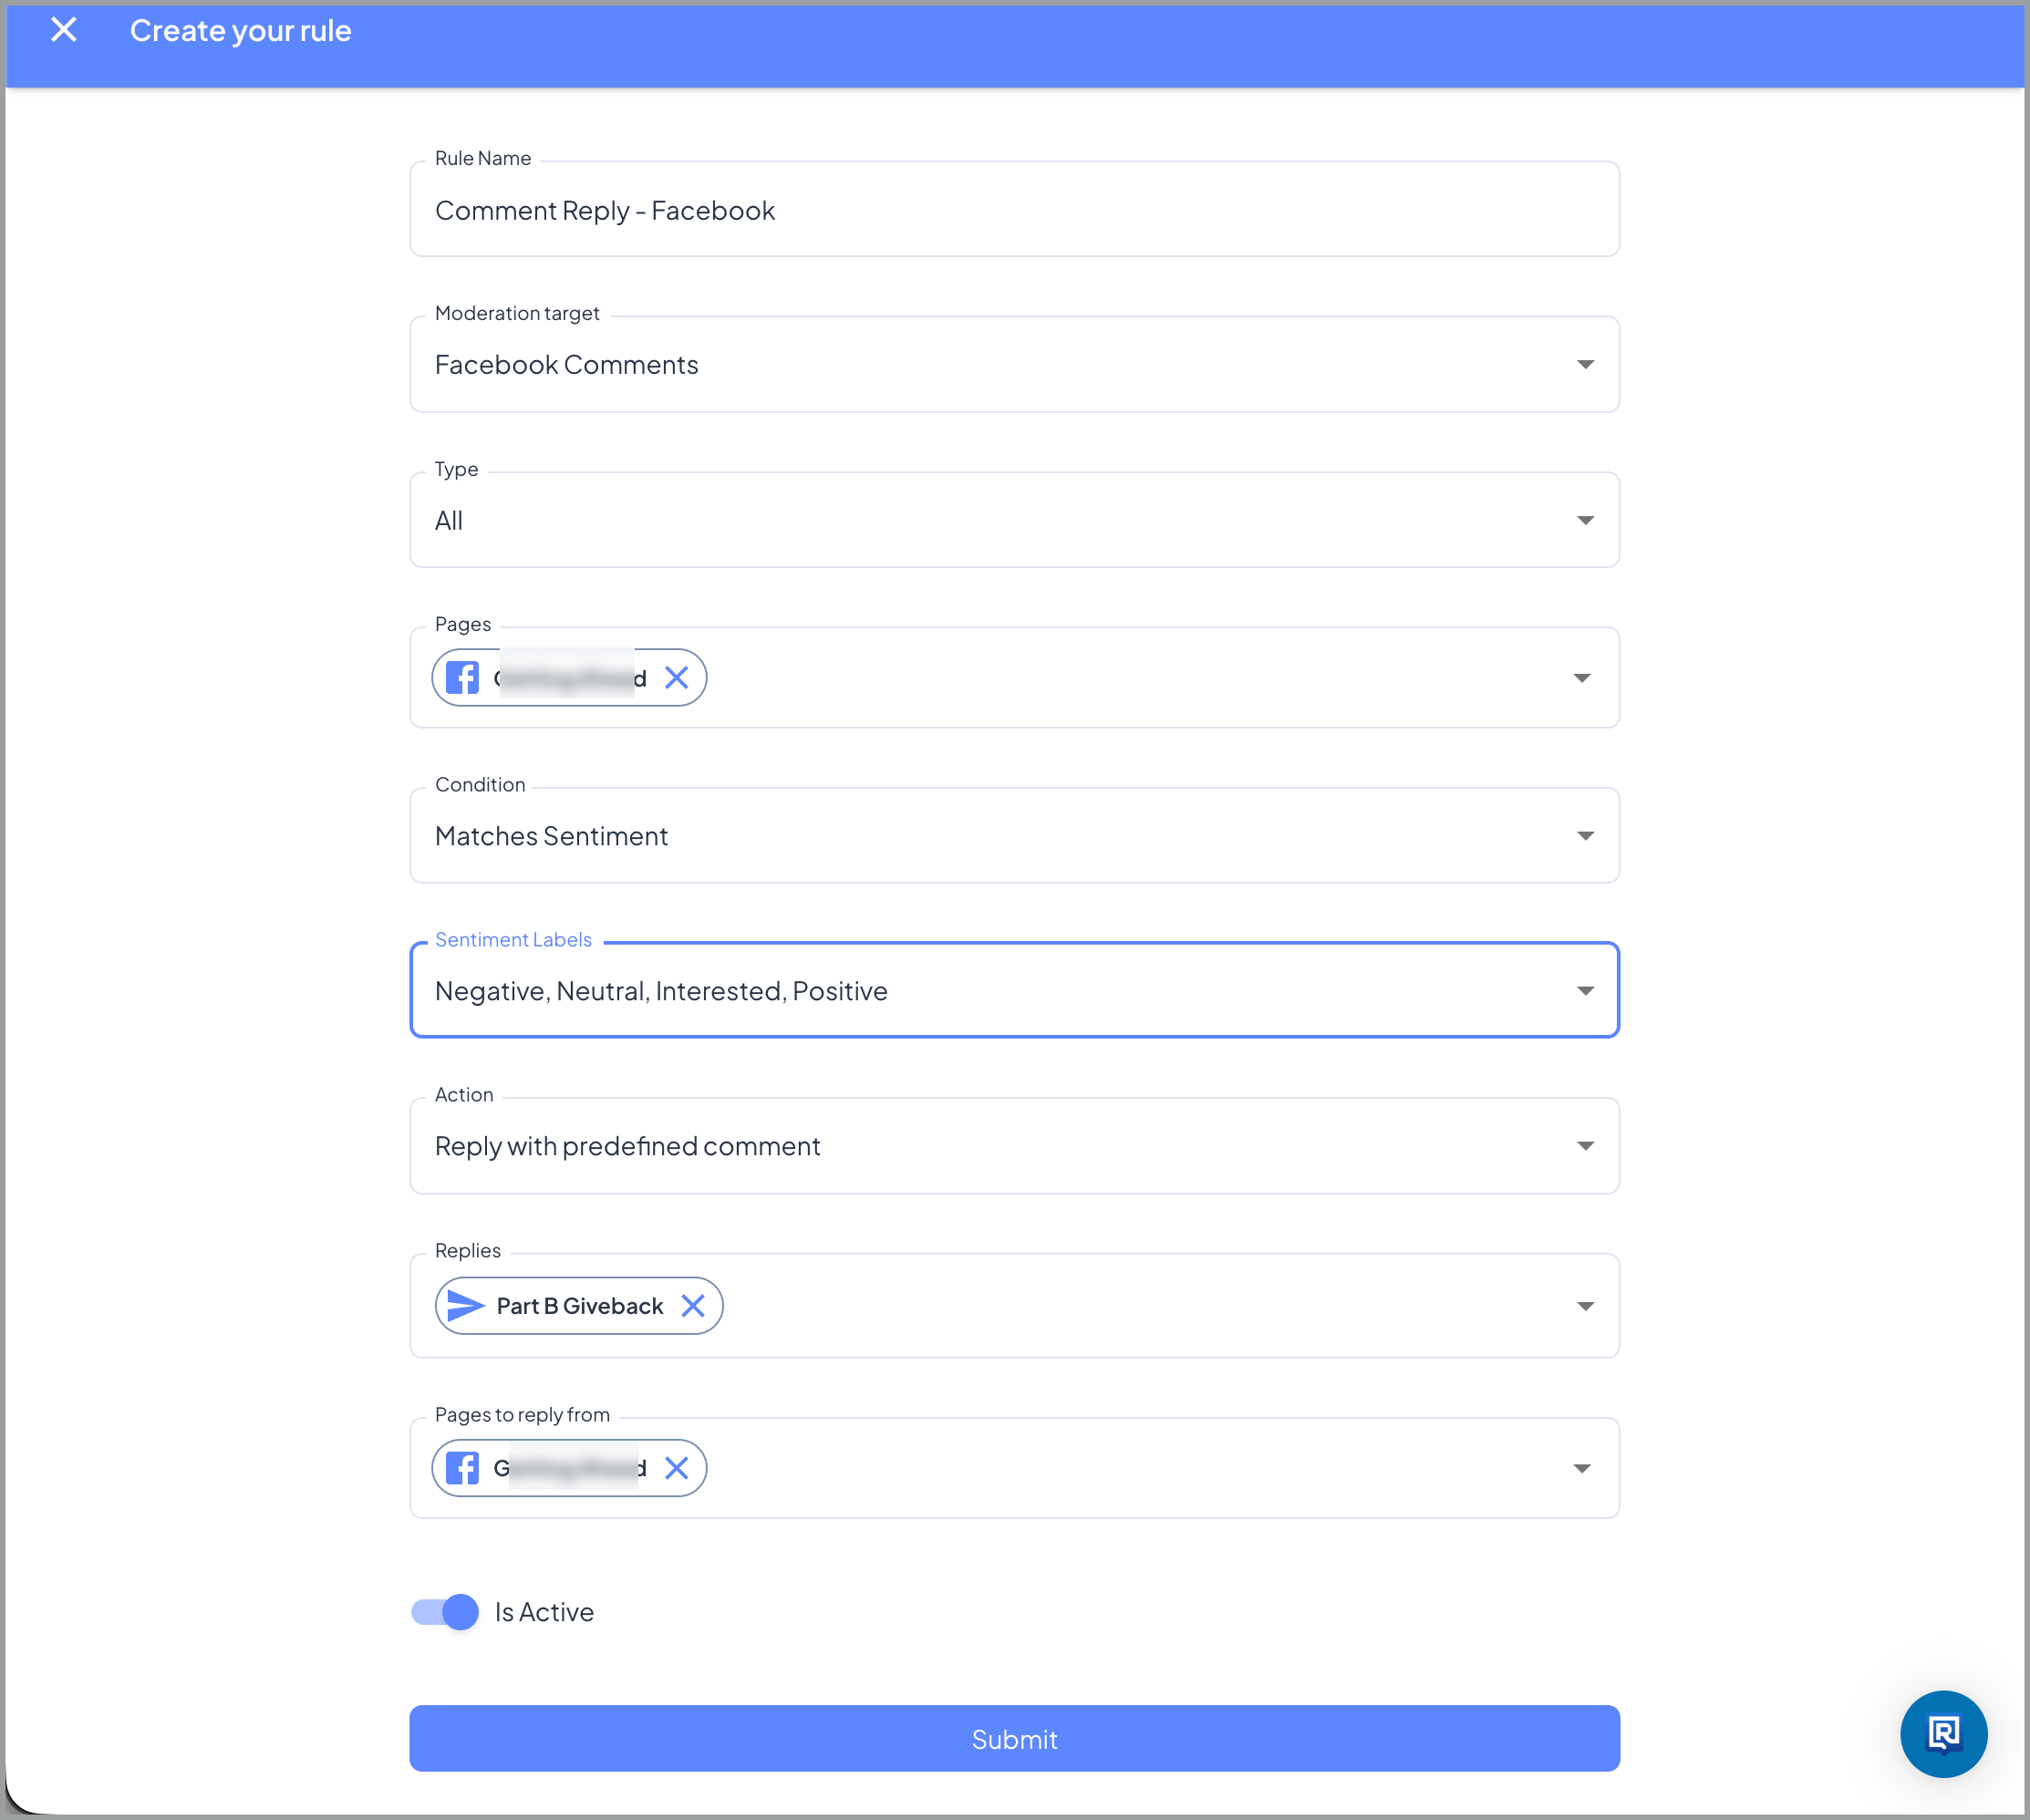
🤖 Path B - Reply with an AI agent
Use this path if you want your agent to read each comment and generate a contextual, personalised reply. Better for high-volume accounts where replies need to vary based on what the commenter says.Step 7B - Set the action and select your agent
- Set Action to Reply with AI agent
- Select your Comment Reply agent from the dropdown
Step 8B - Submit and activate
Click Submit to activate the rule.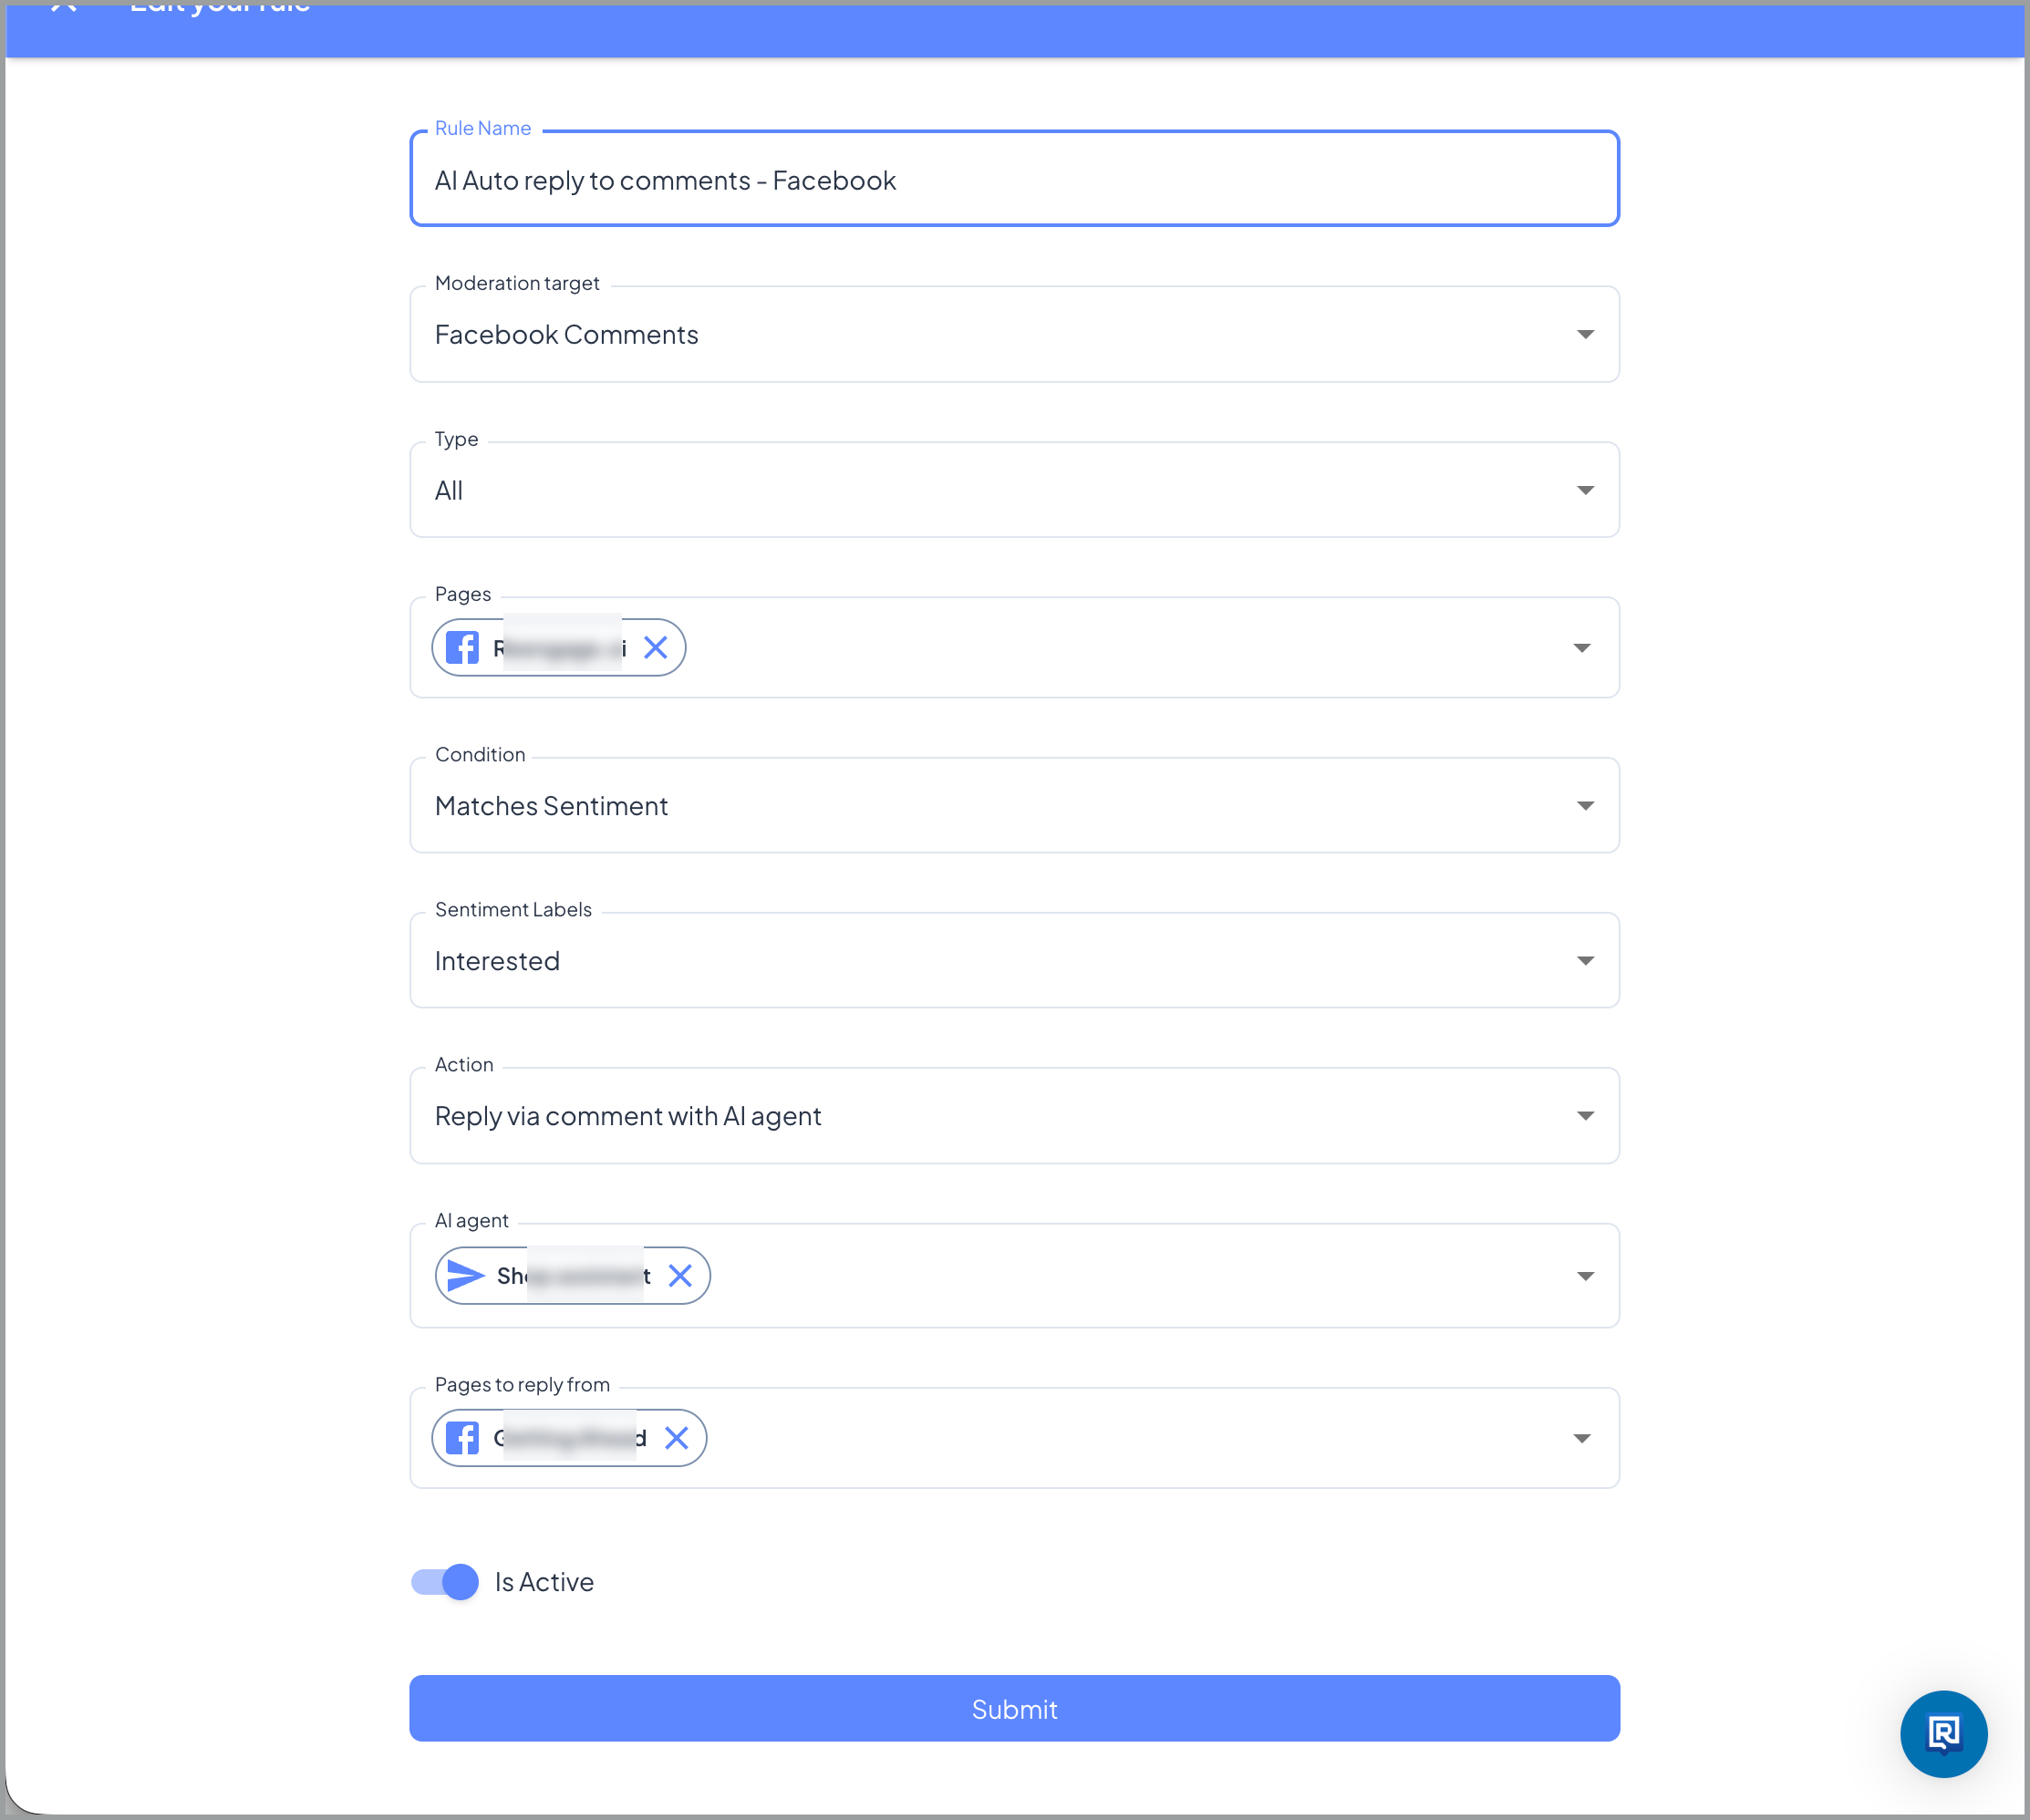
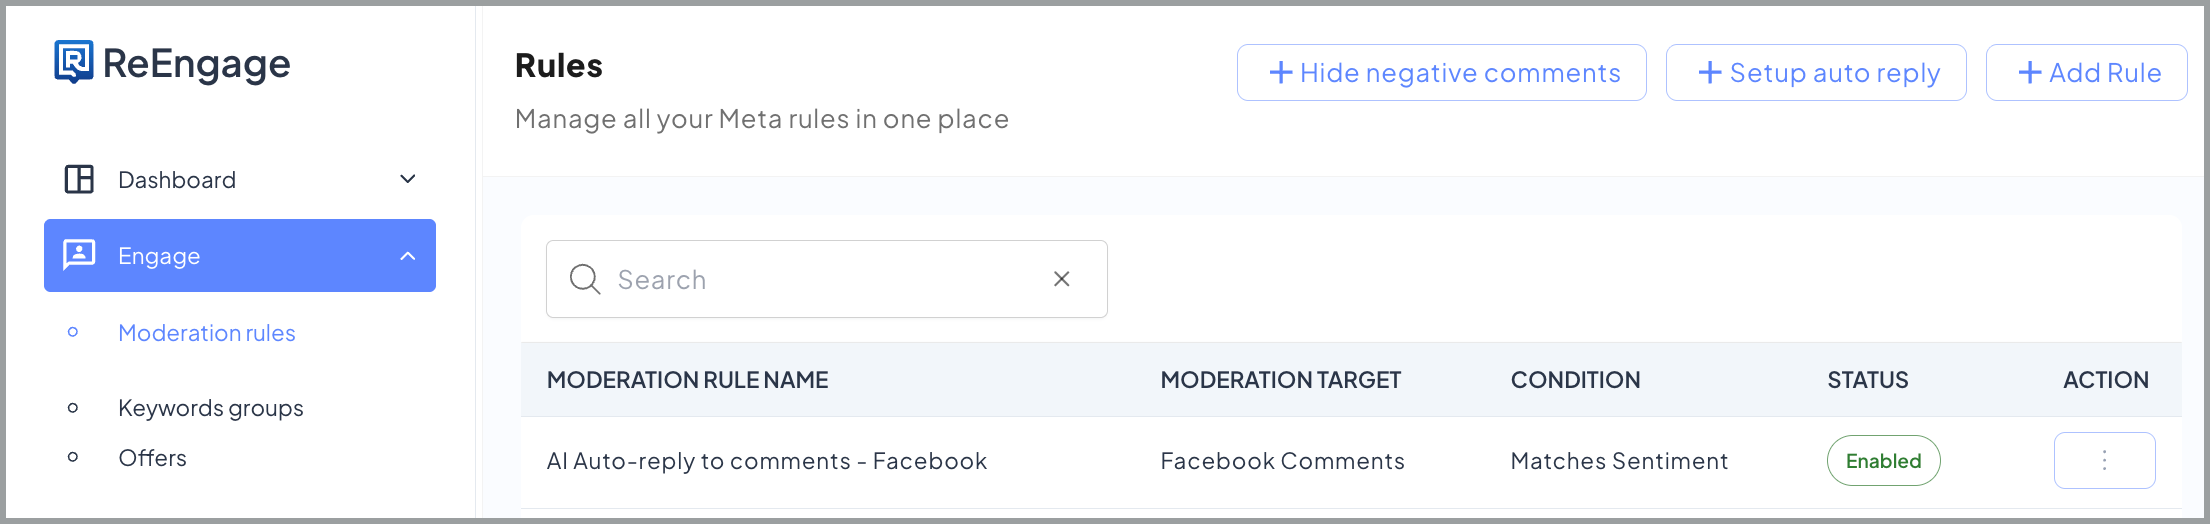
✅ You’re done when your rule appears in the Rules list with an active status.
🔄 Rotating replies and split testing
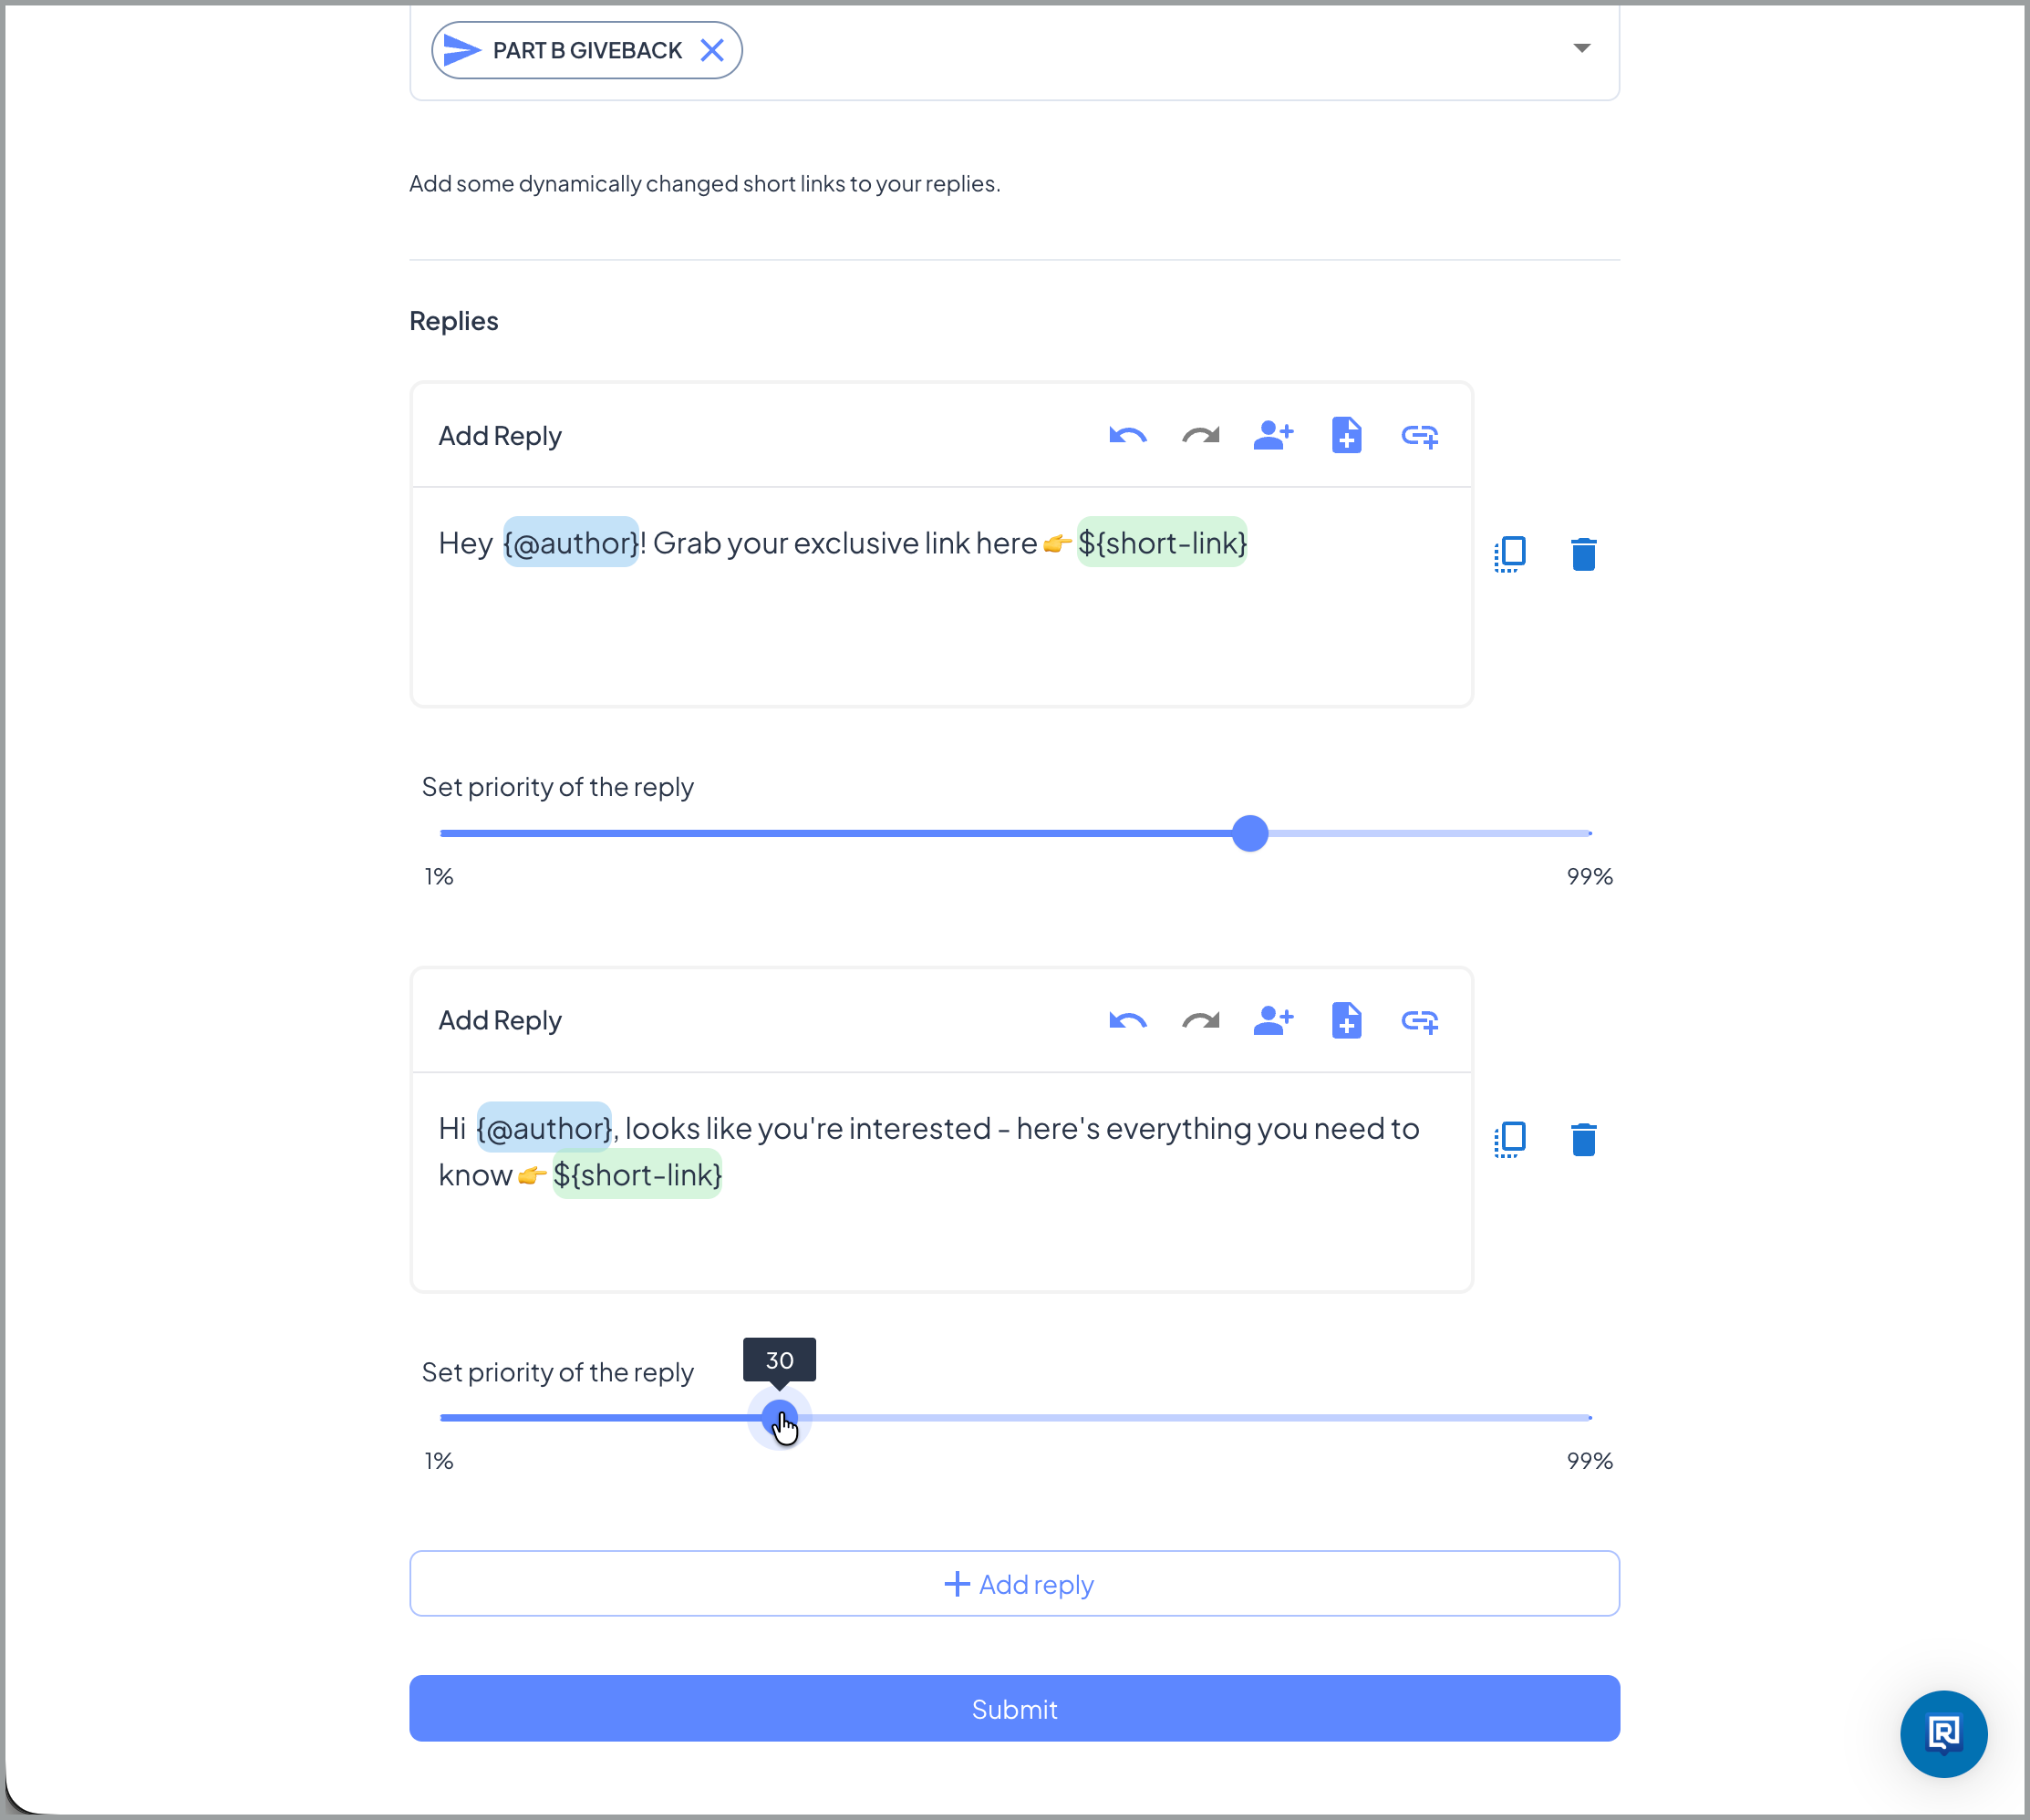
Available for predefined replies only. You can create multiple reply variants inside a single reply group and assign each a probability weighting. Exerta rotates through them based on those weightings. Over a large enough volume, each variant gets sent in roughly the proportion you set. This is useful for avoiding the exact same message appearing repeatedly on your posts. It does not provide performance data on which variant performs better.📋 Planned feature: Reply-level performance analytics, showing which variant generated more clicks, are planned but not yet available.
❓ FAQs
💬 Q: What’s the difference between predefined and AI replies? Predefined replies and AI replies work differently and suit different needs. Predefined replies send fixed text you write yourself. The same reply, or a rotation of variants, goes out to every matching comment. Best for consistent, on-brand replies that don’t need to vary. You control exactly what is said. AI replies let your agent read each comment and generate a contextual response. Better for high-volume accounts where replies need to vary based on what the commenter actually says. Requires an AI agent to be configured by the Exerta team.🔍 Q: When should I use “Does Not Contain Keywords but Sentiment Matches” instead of “Matches Sentiment”? Use “Does Not Contain Keywords but Sentiment Matches” when you have a separate keyword-triggered DM rule and want to prevent the same comment from triggering both a reply and a DM.
- Add your keyword DM trigger words to the exclusion list on this rule
- Any comment containing those words will be handled by the keyword DM rule only and won’t also get a comment reply
⚙️ Q: How do I personalise replies with the commenter’s username? Use the
{@author} token in your predefined reply text. Exerta will automatically replace it with the commenter’s username when the reply is sent. Note that {@author} is supported on Facebook only. Do not use it in Instagram reply groups.
🔍 Q: Should I include Negative in my sentiment labels? Including Negative is optional. If you include it, your reply will also fire for comments that have been hidden from public view. The commenter still receives the reply even though no one else sees their original comment. This can help turn a negative experience around privately.
⚠️ Q: My comment reply rule isn’t firing. What should I check? Check these in order:
- No offer attached: both predefined and AI reply rules require an offer to be set up first
- No agent assigned: for AI replies, confirm an agent is selected under the Action field
- Processing Mode is on Standard: only the first matching rule fires. Set it to Advanced. See [Understanding Processing Mode].
- Moderation Target doesn’t match the platform: an Instagram rule will not catch Facebook comments
- Sentiment labels are too narrow: if you’ve only selected Interested, you’re missing most comments. Add Neutral and Positive.
📋 Q: Do I need a separate rule for Facebook and Instagram? Yes. Facebook Comments and Instagram Comments must be configured as separate rules. One rule cannot cover both platforms.